
So procrastination has gotten the best of me and the rush to finish a few crocheted Christmas gifts has kept me without much sleep in the last day and night. I have finished one of the gifts today (after burning the midnight oil until about 6am and starting all over again at 11am today...whew!) This FO was well worth the hours of work and sleeplessness as this lil guy turned out awesome. This gift is for my brother who is one of the biggest Star Wars geeks I know, who just so happens to be one of the few loyalists who like and appreciate those adorable butt-kicking Ewoks of Endor from Return of the Jedi.
So you ask, what better gift for a fan of the Ewoks and a fan of the 6th installment of Star Wars....of course...an Amigurumi Wicket!!
The pattern I used was manipulated from an original pattern ("Wicket-the-Ewok") by Lucy Ravenscar found on Ravelry. The Pattern is also available at Craftster. I switched up a few things, just to make it my own and to adapt to my style of crochet.
The pattern I used was manipulated from an original pattern ("Wicket-the-Ewok") by Lucy Ravenscar found on Ravelry. The Pattern is also available at Craftster. I switched up a few things, just to make it my own and to adapt to my style of crochet.
This project was challenging in the following ways:
- The torso is worked in 1 piece from the bottom up. This is a different technique that was very effective for the shape of the lower body, but not one I am accustomed to using, I plan on using similar methods in the future for legs/feet. The single torso structure aids in stability and form.
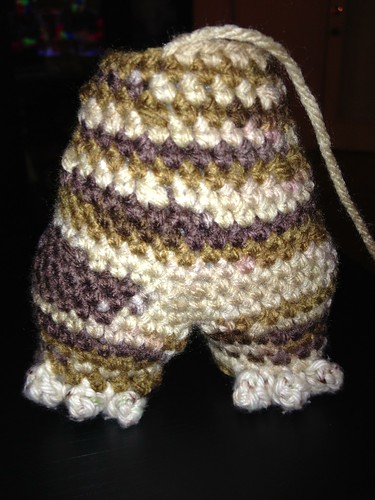 |
| Wicket Torso with toe detail |
- The pattern called for using a 3 dc bob stitch for the hands/arms and a 3 dc pop stitch for the feet/toes. Both of these stitches were a first for me. I ended up scrapping the 3 dc bob stitch for the fingers/hands and utilized a basic arm in the round instead. The finger work was a bit cumbersome to work with and I felt they ended up a tad too busy. I kept the special stitch 3 dc pop for the toes as they were great for the balance and overall look of the ami
 |
| Standard Arms worked in the round |
- There were 2 options for creating the face/head of Wicket. I opted for the more detailed and challenging of the two: Head #1 which uses embroidery detailing for the face and mouth. This was the most time-consuming aspect of the project, but all the time and effort that went into the detailing was well worth it!
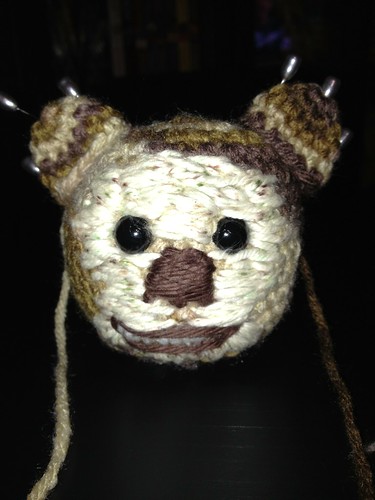 |
| Wicket Head with embroidery detail |
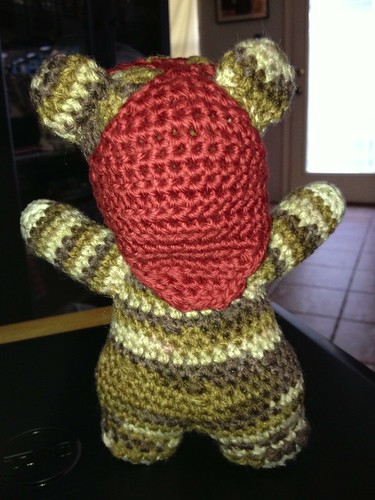
- There were 2 options for creating the cowl. I originally was going to move forward with using felt for the cowl, which would have been a bit quicker, and the color I had picked out was nearly spot-on...something just told me to go for the crochet method for the cowl. Even though the yarn I had in my stash was a dark burnt orange vs a lighter russet color (which is more accurate) I think it makes the Ami a bit more unique & crocheting it was a blast! The cowl was worked in 2 parts (front/back) then whip stitched together & slipped over the head (So yes...it can be removed!)
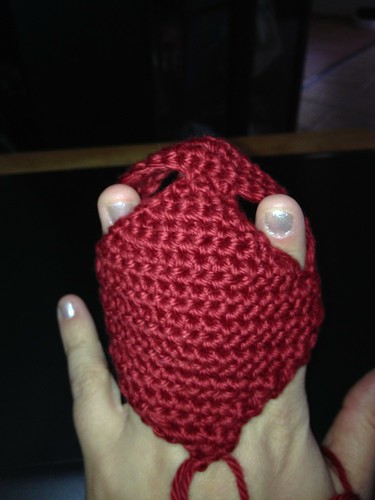 |
| Wicket Cowl |
Overall, I am super excited to give this gift to my brother tonight, as I know he will be excited! The only hard part is giving Wicket away, as he turned out so cute, & a part of me wants to keep him for myself....I guess I can always make another one!!
 | ||
Wicket!
|
Now onto the next gift....
Thanks for reading!